Android 開發第一步 - 開發環境建置
今天的客戶想在 Asus 的變形金剛上開發一個控制家電的軟件, 剛好我有一台變型金剛 Asus TF101,不過看來開發還是要在 Window 上進行,不管案子接不接還是先把開發環境灌好再說。
為了方便,想把開發環境灌在筆電上,筆電上目前安裝的是 Window 7 32位元的系統,先上網找到 Android Developer 上的 Instilling the SDK。
首先跟著
Step 1. Preparing Your Development Computer
接著
為了方便,想把開發環境灌在筆電上,筆電上目前安裝的是 Window 7 32位元的系統,先上網找到 Android Developer 上的 Instilling the SDK。
首先跟著
Step 1. Preparing Your Development Computer
- 我的硬體架構應該沒問題。
- 在 Window 7 的 cmd 視窗中執行 java -version。
 |
| 執行 java -version |
 |
| jdk 安裝 |
- 安裝完之前還會先連上Oracle 網站上註冊。
- 安裝完後再次執行 java -version :
 |
| jdk 1.7.0 |
- 按照建議去下載 "Eclipse Classic" ,目前 Eclipse 的版本是 3.7,解壓縮後直行 "eclipse" 就可以和到畫面:
 |
| eclipse 執行畫面 |
Step 2. Downloading the SDK Starter Package
- 先下載 SDK download page 的 android-sdk_r12-windows.zip。
- 解壓縮 執行 "SDK Setup.exe" :
 |
| SDK Setup.exe 選擇 Accept All 再 Install |
- Install 畫面:
 |
| SDK install 畫面 |
- 記住 SDK 存放的位置。
 |
| SDK 存放的位置 |
Step 3. Installing the ADT Plugin for Eclips
- 替Eclips 安裝ADT Installing the ADT Plugin:
- 執行 Eclipse, 然後選擇 Help > Install New Software....
- 畫面右上角選擇 "Add....."
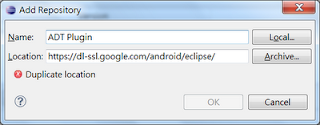
- 在 Add Repository 對話視窗中,"Name" 空格中填入 "ADT Plugin" , "Location"空格中填入以下的超連結:'https://dl-ssl.google.com/android/eclipse/'。
- 按 "OK" 鍵繼續。
 |
| Install New Software |
 |
| 填入 ADP Plugin 及 URL |
- 在 Available Software 中, 勾選 Developer Tools 然後按下 Next。.
 |
| 勾選 "Developer Tools" 然後按 "Next" |
- 檢視已安裝的工具再按下"Next"。
 |
| 已安裝的工具 |
- 閱讀並接受授權,再按 "Finish" 結束。
 |
| 接受授權並結束 |
- 畫面跟著會出現 "Installing Software" 的視窗。
 |
| Installing Software |
- 重新啟動 "eclipse"。


留言
張貼留言
請多指教